

Introduction
Pencil drawing is one of the most accessible and versatile forms of art. Whether you are just starting out or looking to refine your skills, mastering pencil techniques can significantly improve your artistic expression. With only a pencil and paper, you can create anything from simple sketches to highly detailed, realistic artwork. That simplicity is exactly what makes pencil drawing so powerful.
However, many beginners struggle with control, shading, and proportions. Even intermediate artists often feel stuck at a certain level and unsure how to progress. The good news is that improvement doesn’t require expensive tools or formal training. Instead, it comes from understanding the basics, practicing consistently, and applying the right techniques.
In this guide, you’ll learn practical pencil drawing tips that are easy to follow and highly effective. From understanding different pencil grades to mastering shading and avoiding common mistakes, this article covers everything you need. By the end, you’ll have a clear roadmap to enhance your drawing skills and build confidence in your work.
What is Pencil Drawing?
Pencil drawing is the art of creating images using graphite pencils on paper. It involves techniques such as sketching, shading, blending, and detailing to produce a visual representation of an object, idea, or scene.
Unlike painting or digital art, pencil drawing focuses heavily on line quality, tone, and texture. Artists use different types of pencils, ranging from hard (H) to soft (B), to achieve various effects. For example, harder pencils create lighter lines, while softer pencils produce darker and richer tones.
Pencil drawing can be as simple or complex as you want. A quick sketch might take a few minutes, while a detailed portrait could take hours or even days. This flexibility makes it suitable for both beginners and experienced artists.
Why is Pencil Drawing Important?
Pencil drawing plays a foundational role in the world of art. It is often the first medium artists learn, and for good reason.
First, it helps develop observation skills. When you draw, you learn to notice details, proportions, and shapes more carefully. This improves not only your drawing but also your overall artistic awareness.
Second, it builds hand control and coordination. Regular practice strengthens your ability to create precise lines and smooth shading.
Third, pencil drawing is essential for planning. Many artists use sketches as a base before moving on to painting or digital work.
Finally, it encourages creativity without pressure. Since pencils are easy to erase and adjust, you can experiment freely and learn from mistakes.
Detailed Step-by-Step Guide
Step 1: Choose the Right Materials
Start with basic tools:
- HB pencil for general sketching
- 2B to 6B pencils for shading
- A good quality eraser
- Smooth drawing paper
You don’t need expensive supplies in the beginning. Focus on control rather than tools.
Step 2: Learn Basic Shapes
Break complex objects into simple shapes like circles, squares, and triangles. For example, a face can start as an oval, while a house can begin with rectangles.
This approach makes drawing easier and more accurate.
Step 3: Practice Line Control
Use light strokes instead of pressing hard. Keep your hand relaxed and draw from your shoulder rather than just your wrist.
Practice straight lines, curves, and different patterns daily.
Step 4: Understand Light and Shadow
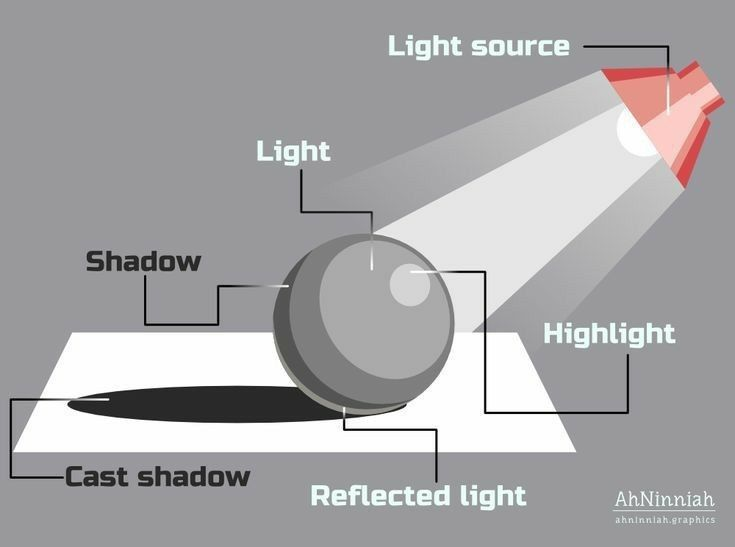
Shading is what gives your drawing depth. Identify the light source and determine where shadows fall.
Start with basic shading techniques:
- Hatching
- Cross-hatching
- Circular shading
Gradually build darker tones by layering.
Step 5: Use Blending Techniques
Blending helps create smooth transitions between light and dark areas.
You can use:
- Blending stumps
- Tissue paper
- Your finger (with care)
Avoid over-blending, as it can make your drawing look flat.
Step 6: Focus on Proportions
Measure relationships between different parts of your subject. For example, compare the width and height of objects.
Use guidelines to maintain accuracy.
Step 7: Add Details Gradually
Start with a rough sketch, then refine it step by step. Avoid jumping into details too early.
Details should enhance the drawing, not overwhelm it.
Step 8: Review and Adjust
Take a step back and observe your work. Look for errors in proportions, shading, or alignment.
Use an eraser to make corrections and improve the overall quality.
Benefits of Pencil Drawing
- Improves focus and concentration
- Enhances creativity and imagination
- Develops observation skills
- Requires minimal investment
- Portable and easy to practice anywhere
- Builds a strong foundation for other art forms
- Helps reduce stress and anxiety
Disadvantages / Risks
- Can be time-consuming for detailed work
- Smudging can ruin clean areas
- Limited color range compared to other mediums
- Requires patience and consistency
- Beginners may feel frustrated with slow progress
Common Mistakes to Avoid
One common mistake is pressing too hard on the pencil. This makes it difficult to erase and limits shading flexibility.
Another issue is ignoring proportions. Even a well-shaded drawing can look wrong if the proportions are off.
Many beginners also overuse blending, which removes texture and depth. It’s important to maintain some visible strokes.
Skipping basic shapes is another frequent error. Without a proper foundation, drawings often look unbalanced.
Finally, rushing the process leads to poor results. Good drawings take time and careful attention.
FAQs
1. What type of pencil is best for beginners?
An HB pencil is ideal for beginners because it provides a balance between light and dark tones. You can also use 2B for softer shading.
2. How can I improve my shading skills?
Practice regularly using simple objects like spheres and cubes. Focus on light direction and gradually build layers of shading.
3. Is it necessary to learn drawing every day?
Daily practice helps, but consistency matters more than frequency. Even short sessions a few times a week can lead to improvement.
4. Why do my drawings look flat?
This usually happens بسبب lack of contrast. Add darker shadows and brighter highlights to create depth.
5. Can I learn pencil drawing without a teacher?
Yes, many artists are self-taught. With proper guidance, practice, and patience, you can improve on your own.
6. How long does it take to get good at drawing?
It depends on your practice and dedication. Some people see progress in a few weeks, while mastery can take years.
Expert Tips & Bonus Points
Start with light sketches and gradually build darker tones. This gives you more control and flexibility.
Use reference images to understand real-world details. Observing from life can also improve accuracy.
Rotate your paper occasionally to draw more comfortably and achieve better angles.
Keep your pencils sharp for precise lines, especially when working on details.
Experiment with different techniques to discover your style. Don’t limit yourself to one method.
Maintain a sketchbook to track your progress. Reviewing old work helps you see improvement and identify areas for growth.
Most importantly, stay patient. Improvement in drawing is a gradual process, and every practice session counts.
Conclusion
Pencil drawing is a skill that anyone can learn with the right approach and consistent practice. It doesn’t require expensive tools or advanced knowledge to get started. Instead, it begins with understanding the basics and gradually building your abilities.
By following the tips shared in this guide, you can improve your control, shading, and overall drawing quality. From choosing the right materials to avoiding common mistakes, each step plays an important role in your progress.
Remember that every artist starts as a beginner. Mistakes are part of the learning process, not something to fear. The more you practice, the more confident and skilled you will become.
Keep experimenting, stay consistent, and most importantly, enjoy the process. Over time, you will notice significant improvement in your work, and pencil drawing will become not just a skill, but a rewarding and enjoyable habit.